| Nikon D70 - first tests | |||
| Nikon D70 is the new digital reflex from Nikon. It is supposed to compete against the canon 10D and 300D. Christian Buil bough a 10D few months ago. But, as I have previous Nikon lens, I decided to buy the D70... This allows us to make direct comparison for astronomical usage.
For all the measurements and extensive tests, please refer to Christian's page here. Only first tests on the sky will be presented here. There were performed on Christian's balcony, in the peripherical of Toulouse, a large, well illuminated city. Want to see sun images also with D70 ? click here |
|||
| The digital camera setting |
| I already had 2 Nikon lenses:
- a 180mm f/d 2.8 AF It appeared that both two lenses are of excellent quality compared to canon lenses tested by Christian. Good alignment and small distorsion on the border of the field.
The remote IR control command To trigger the D70 in M-Bulb mode, you do not have a lot of choice. Either you do it manually by pressing the button with the risk of vibration, or you use an Infrared command. The Nikon capture software does not allow you to control from the PC a Bulb exposure, which is really too, too, too bad. The Infrared remote command was not available at that time. But we found on the web a software which runs on Palm and use the Palm IR port to trigger any type of IR device: Omniremote software can be downloaded for free as a 15 days trial version or can be bought at a cost of 25$. In addition to Omniremote, you need the hex code to excercise the D70. This is available on other site, natec.com where a guy trained a Nikon IR remote command and put the data for free for any one. I installed both the database and the omniremote software on my Clie NR70V and it worked perfectly. One click to open the shutter and another to close it.
Make sure you set-up the time-out of the IR port to its maximum. In the D70 menu, select the 15min value for the IR. I can imagine than Birds catcher also may be upset by this, not easy to go back to the camera every 15 minutes to re-energize the IR receiver when you place your camera in a well hidden place...
The IR receiver being located on the front of the camera, you need to make sure you beam the sequence at the right place ohterwise the receiver will not "see" the command. For long exposure you can shut down the palm to save battery and re-energize it before the end. A clock is quite useful to indicates when the exposure is supposed to end. I finally found a way to program a macro button on omniremote but did not test it on the sky yet. See here for more details. The digital camera with the lens was directly attached to a NJP equatorial mount for sky images. "Mode 3" acquisition - the "real raw" image mode As mentioned on Christian Buil's site, the big drawback of the D70 for star imaging is a powerful medium filter applied on the raw image before internal storage. The trick he found to by-pass this filtering is the following: - set your camera in "dark subtracted" mode (also called "noise reduction") - at the end of the regular exposure, the D70 will take a dark image at the same duration of the previoulsy acquired image. - during the dark acquisition, turn off the camera (Nikon said there is no damage to do this). You can see then the green led flashing indicating that an image is being written on the card. That's the raw image, and this image has NOT been median filtered... The difference is astonishing.
It is a pity that Nikon did not included in its firmware a way to disable this feature for scientific or debug usage. Let's lobby to get this in a future version. Contact Nikon Customer service and ask for it !! - Nikon Site. |
||||||||||||||||


| Image processing |
|
Standard image processing has to be performed to get the best of the images. A serie of 3 offset have been acquired - transformed into fit images, then averaged
A serie of 5 dark of 90s each have been acquired - transformed into fit images, then averaged
A serie of 5 flat have been acquired
Refer to the new IRIS tutorial web page to get step-by-step description of the IRIS command. Christian had to make it after my two days of questions as I was trying to remember in which order you have to convert which image and so... All the signal handling processing are made in the fit domain (fit images ). For the Registration, you need to reconvert the fit image with the red, blue, green pixels from the bayer matrix into a 48 bits colored image, otherwise the star registration will not be accurate. |


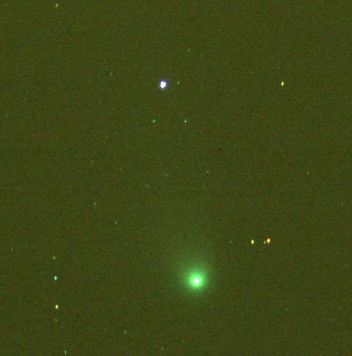
| Some results |
|
||||


