INTI process spectroheliographic scans of the sun to automatically produces the reconstructed monochromatic image with only one click... It is an original work designed for Sol'Ex spectrograph to process video ser files on 16 bits.
Installation
1. Download the zip file
For windows: http://valerie.desnoux.free.fr/inti/inti.zip
For Mac: soon to come...
2. Extract the inti directory on your disk or on usb key
Once unzipped you'll have a directory with a lot of files. INTI has been written in Python and to deploy a Python program as an executable the installator includes a lot of files to recreate the python required environment.
3. Click on INTI_[language].exe to launch the application
The exe file is in the unzipped directory. It may take a dozen af seconds before the user interface appears. Maybe less at second launch
At launch, windows does not recognize the signature so may display a warning to protect your pc from virus and prevent the program to execute. Trust the program and force windows to execute it anyway.
For english language, launch inti_EN.exe - for french, launch initi_FR.exe
If you have issues with the inti.yaml file, please remove it and restart the program. Make sure the directory has write acess mode enabled.
At first launch, it may take time to display the interface.
INTI manual

1. Click on open to select one or multiple .ser scan of the sun disk
INTI will open a system dialog box for file selection. Can be a unique file or a multiple selection of SER video files.
or
1.Click on "Last" instead of "Open"
If you have processed already one file in your current acquisition directory, click on Last instead of "Open " will process the last file found in the directory. No need to select the name of the last file. But at least process one so INTI can know the directory to look at the last file.
2. Click on ok
That's it !
Some intermediate results will be displayed in the black cmd windows behind the user interface. They are also logged in a text file name 'yourserfilename_log.txt'.

At the end of the processing, four windows will appear. You can move the mouse over une image to see a small zoom window. This is helpful to check focus during acquisition.

You have also 2 sliders to adjust image thresholds - the top one sets the value below all pixels will be set to zero (black) and the second one sets the value above all pixels will be set to 65535 (white). This is a quick way to adjust contrast and brightness.

Click on the image you want to adjust the display. The settings and image will not be saved as you display, the saved image use the automatic settings to avoid mistake.
Here are the png images saved to the disk
- Raw... the raw disk with no transversallium and geometric corrections - this is proposed for quick check after acquisition to adjust the exposure time / frame per second to have quasi circular disk
- Contrast... a view of the final image with predefined contrast thresholds
- Protus... a view of the final image with thresholds adequate for low intensity protuberances view and black occulting disk
- Clahe... final image with the post-processing 'contrast local adaptation histogram equalization' applied
INTI will create 3 sub directories in your working directory
- BASS2000... it will save the 3 files generated for upload to BASS2000, 2 fits files disk and protus and the thumbnail as jpg
- Clahe... all the clahe processed png files, for quick review
- Complements... the raw, mean and other fits and png files of complementary images
3. Exit INTI
If you process a unique ser file... the 4 images will stay for 1 min - if you want to exit before, make sure one image is selected then enter Escape key or Enter key
If you process multiple ser file... the 4 images will briefly appears before the next file is processed.
At the end of the processing, once the images are closed, the main window of INTI will stay to allow you to process another file or another batch. To completely exit from INTI click on the Exit buton or the cross on the top right of the INTI window.
4. INTI results
You will find all the results in the directory of your ser file. The name of the files processed always start with underscore "_" then name of the ser file and an extension.
Png Images
- _raw.png ...a view of the monochromatic sun disk as it is scanned, just line by line built, in the Complements directory
- _Disk.png ...a view of the final image with predefined low contrast thresholds
- _DiskHC.png ...a view of the final image with predefined contrast thresholds
- _Protus.png ... a view of the final image with thresholds adequate for low intensity protuberances view and black occulting disk
- _Clahe.png ... final image with the post-processing 'contrast local adaptation histogram equalization' applied, in the Clahe directory
- _grid.png... image fwith stonyhurst grid, in the BASS2000 directory
Dat file
- .dat profile of line from the _mean.fits image in the Complements directory, can be open with vspec or equivalent
Fits images
- _recon.fits ... final fits image
- _raw.fits ... raw disk reconstructed from the scan, in the Complements directory
- _mean.fits ... scan frame average, in the Complements directory
5. Dopplergram and Continuum
To get a composite image made of 2 images with same wavelength shift from central line wavelength aka called a dopplergram image or to get the image from wavelength outside of a line, also called continuum image you have to click on the tab, enter the value in pixels of the respective shifts. Click on Ok to generate the doppler and continuum images.

You have the capability to shift the 2 doppler images around a constante set in Doppler shift. Instead of having the 2 images at -2 pixels / +2 pixels of the center, if you enter a value for the doppler shift, the 2 doppler images will be computed at doppler_shift - 2 pixels / doppler_shift + 2 pixels
To help you to understand the shape of the line, you can view the line profile with the "Profile" button - If the SER file has never been processed , the Profile button will not display the graph. A filename.dat file contain the 1D profile and is located in the complements. It is computed each time you process a file.

You have also the capability to reverse order of blue - red wings with the option B-R flip
I do this process on one of the best image of my serie of observations, to select the best, I use INTI_Selector
At the end of the process, if no errors are encountered you will have 2 additional png images displayed and stored with the extension _doppler.png and _cont.png
Errors can occur if the pixel shift is outside of the image over the length of the slit. Also some pink pxels may appears if the image is saturated. Zoom fonction is not enabled on those images.
.jpg)
Additional 3 fits images will be provided as well.
- xx_recon_cont_value of pixel shift.fits
- xx_recon_dp_--value of pixel shift.fits (first doppler image: - pixel shift)
- xx_recon_dp_+value of pixel shift.fits (second doppler image: + pixel shift)
6. Advanced settings
You can easely from the basic interface ask INTI to build the monochromatic images with a pixel shift (aka wavelength shift) to explore around the central line. Make sure the pixel shift will still fit the image size all along the spectral line.
If you click on the small arrow next to advanced, additional settings are provided
 |
|
Database compatibility
If you click on the small arrow next to database compatibility, addtional fields and services are displayed.
This has been designed to be compliant with professional Solar Database as defined by the BASS2000 team as of today. It requires mandatory information and correct orientation of the sun.

Refer to the additional operator manuel for a detailed description of the fields and operations to make the image compatible with the solar database (French - English)
You can also watch the dedicated video on youtube Astro-Spectro channel.
Those BASS2000 images will only be generated if you process only 1 serfile at a time.
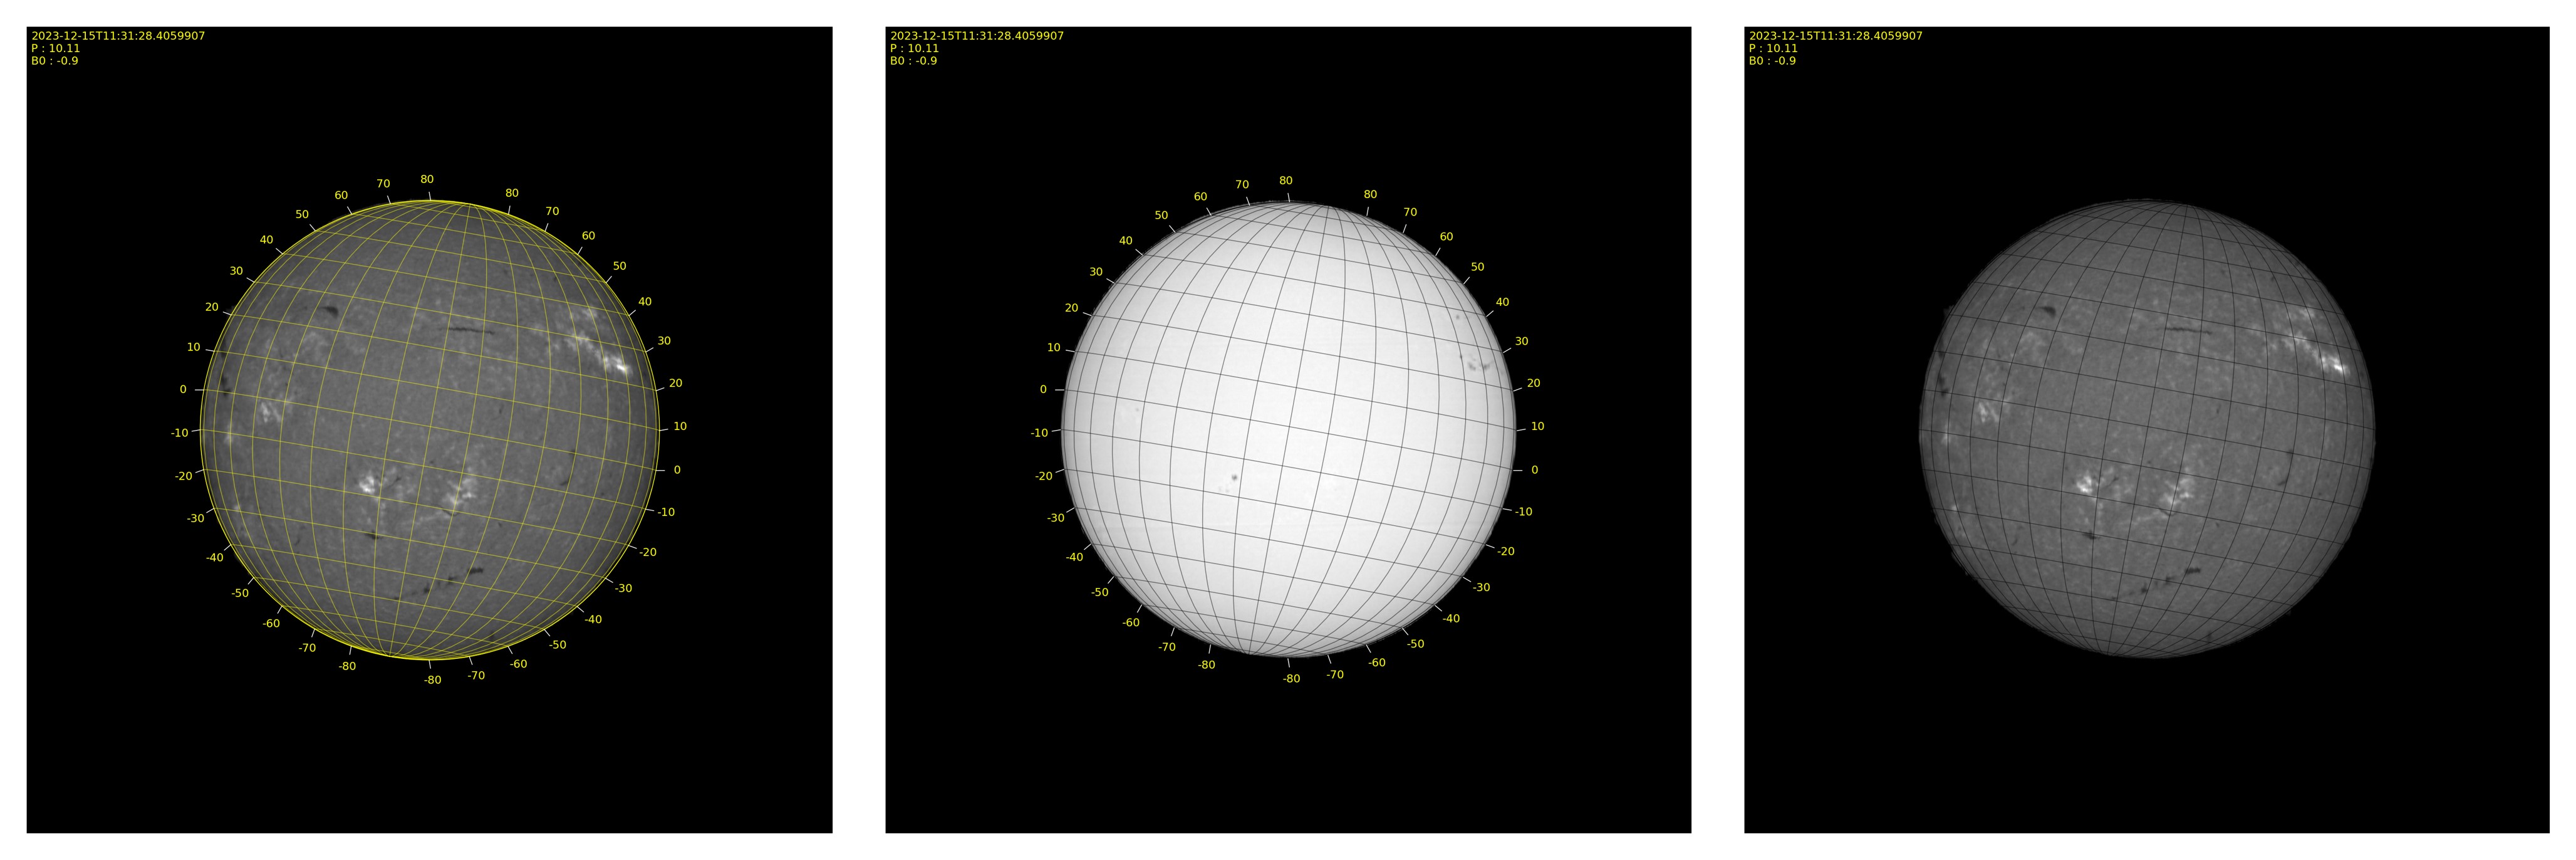
Grid tool
In the BASS2000 directory a file with _grid.png will be created with an overlay of a stonyhurst grid at proper P and B0 angles computed locally. The sun shall be oriented E-W and N-S properly, use the Gong button to retrieve and display in our browser the image at the date of your file.
Grid parameters are accessible with the "grid" button.

By default the grid color will be yellow and the latitude angles will be displayed. But you can adjust the parameters as you prefer.
Calc dispersion computing tool
This Calc button will display a new window to compute the equivalent pixel displacement for a range in angström. The formulas are for the Sol'Ex spectrograph with a grating of 2400l/mm and camera lens focal length of 125mm.

- Select the wavelength domain you want the dispersion to be computed
- Enter the value of the angström range
- Indicates the pixel size and the binning of your camera used for the SER file acquisition
- Click on 'Compute' to see the pixel shift requires to offset by the value in angström
- Click on 'Exit' or on the top cross to close the tool and get the computed value in Shift of Pixels field
7. Doppler sequence
This tab will allows you to generate a serie of reconstructed disk at all the pixel shift within the range entered.

INTI will generate all the images fits and png with "_dpxx" and a mp4 movie named inti.mp4. (H264 codec) - if you process in the same directory a new mp4 sequence, make sure you change inti.mp4 name or it will be override.
8. Magnetogram
This tab is dedicated to the generation of disk at a very faint wavelength and not the darkest one of your video. This is an assistant for polarization and magnetogram as explained in video from Christian Buil on youtube on astro-spectro channel.
A dedicated section on the sequence of the operations, and how to obtain the parameters to fill the tab are available as Processing Guide in french and in english.

In the results, Inti will generate a b- sequence and a r- sequence to be later combined to create the magnetogram. You will need to use the additional Magnet software, included in the distribution to finalize your processing.
9. Free Line
This tab is dedicated to the computation of a sun disk at a specified position of a spectral line. This overrides the automatic function of finding the dark spectral in the image. The detailed process is detailed in the linked pdf file based on Helium image observation. English - French
Also processing guide for sun corona imaging are also available in French and English

SER files for the example below can be download here (2 first SER files to get the parameters) and here (the helium scan)

Christian Buil – Sol’Ex with TS refractor 80/480mm - Helium D3 line image with INTI
10. INTI.yaml file
The INTI.yaml file contains INTI settings at loading.
At the end of a session, the current settings will be saved in this file to restore your preferences next time you will run INTI.
You can manually edit the yaml file by any text editor.
If you reinstall INTI and you still have an inti.yaml file, remove it so INTI will recreate one with the appropraite format, otherwise INTI will not work prperly.
 |
|
Known limitations
INTI automatisation relies on assumption on the acquired scan. Its novelty algorithms is based on an image mean to initiate all the automatic processings. A paper may be published.
Video images are expected to be 16 bits.
If the scan does not start and end outside of the sun then the tilt and the scaling correction based on limbs detection will fail and a defaut scaling will be applied and recorded in the logs.
If the intensities are too low, then edge detection may fail for the scaling correction.
There is no limitation for H-alpha and H&K Spectral lines, but as the algorithm is finding the minimum intensities in the frames, the targeted spectral lines shall be the darkest one unless you operate manually in free line tab.
For more complex situation, ISIS is the reference and will be able to proceed with the fits file from INTI or process directly the ser files.
INTI has been tested by Christian Buil and myself on a lot of different configurations. We are confident it provides reliable results in most of the case.
Windows 7 incompatibility due to python 3.9 and above beeing not supported by W7
Reference
INTI is an original work part of the Sol'Ex project, if you build on it or be inspired by it, please add a reference to : Sol'Ex - INTI by Christian Buil & Valerie Desnoux
Contributions
Python implementation for line extraction acceleration is a code from Doug and Andrew Smiths
Ser files reading is a Python class module developped by Jean-Baptiste Butet, with date decoding from Matt Considine
Ellipse fitting is a python module from Ben Hammel, & Nick Sullivan-Molina. (2020, March 21). bdhammel/least-squares-ellipse-fitting: v2.0.0 (Version v2.0.0). Zenodo. http://doi.org/10.5281/zenodo.3723294
Magnetogram processings and Sun Corona processings are from Christian Buil
The python code is available at https://github.com/Vdesnoux/Solex_ser_recon